• Skip to main content
  • Skip to primary sidebar

Off East Street

ORC Week 8: The Reveal

June 27, 2021 by admin Leave a Comment

I am sliding into home base on this one, but we are finally done with the bathroom refresh we did as a part of the One Room Challenge!

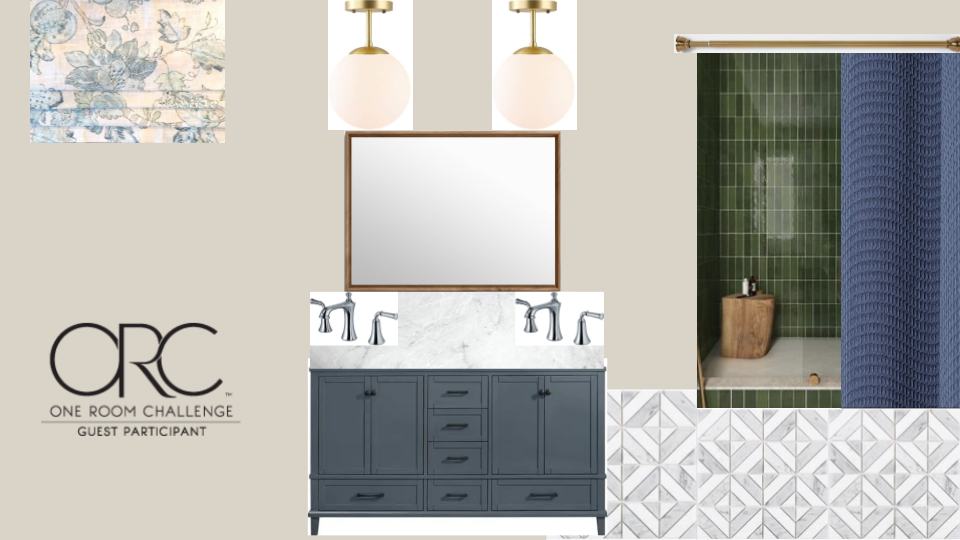
I am so, so, happy with how things came out, but we changed things a lot from where we started. When we started this room, we were working off of the mood board below.

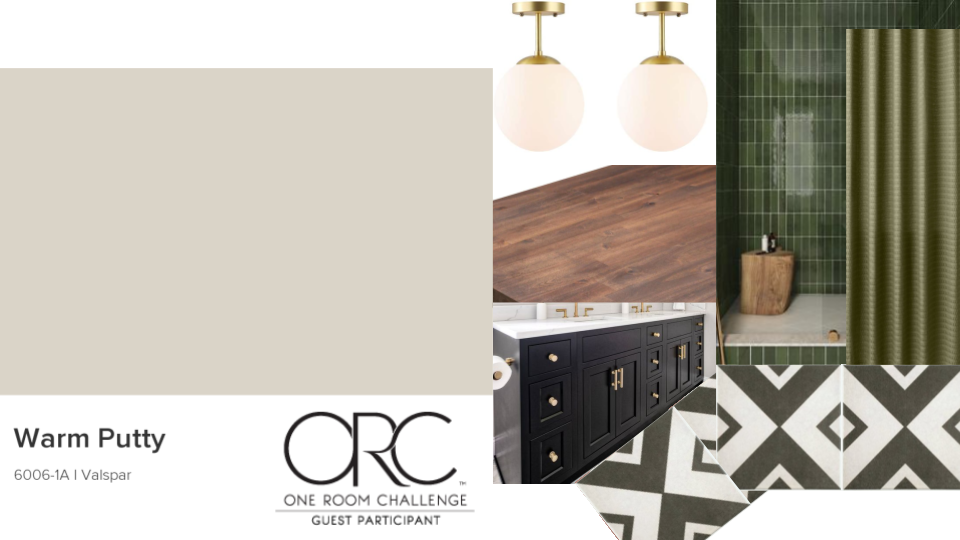
I loved the color scheme, the tile pattern, the warm wood countertop, and the green on green, but it always felt a little too boho/modern for what really wanted. I planned to forge ahead anyway, as the plan was based on some materials that we already had on hand and elements that already existed in the room. We also wanted to keep the budget really tight on this one.

Things really started to shift when we started to shop for countertops. I happened to find a new marble countertop, with undermount sinks on FB marketplace. The cost was roughly the same as what we had budgeted for the butcher block countertop with new overmount sinks. I still hesitated, since it required us to buy new faucets, and that wasn’t in the plan. After we talked it over, it just seemed like too good of an opportunity to pass up. Marble in the bathroom would definitely be preferable to wood, and the under-mount sinks would be much cleaner.

The countertop was a good find, but when I put it into the mood board, I really didn’t love it. The marble with the black vanity, modern tile and tone on tone green just didn’t fit. I worked up a new mood board, and I loved it so much more than the first!

It felt more layered, more soft and traditional, but still had some of the modern elements and color that I was hoping for. I ended up layering in a few other elements too, to keep it from becoming too “coastal”, like a darker print shade and amber glass.

Here’s what the room looks like now:

Painted floor, blue vanity, wood framed mirror, roman shade, modern light

So much better, right? I feel like it’s so hard to convey how a room feels through a photo, they always end up looking a bit colder than reality. This room feels fresh but warm, clean but cozy, and overall leveled up a few notches.

We removed the carpeting, laid peel and stick tile, and then painted the new and old tile in a diamond pattern. We added wood knobs to the vanity and painted it in a medium gray-blue color. The marble countertop is such an upgrade from the previous laminate and the new chrome faucets are really beautiful.

Our original plan was to remove the large mirror and replace it with two walnut-framed mirrors. When we tried to take the mirror down though, we realized it had been glued to the wall. I just didn’t have the fight in me to tear that down and deal with the wall repair, so we left it in place and framed it with walnut-stained trim. While I would have preferred two smaller mirrors, I think this is a good compromise for now. It still adds warmth with the wood trim but required much less wall repair.

We painted the walls, trim, and ceiling Warm Putty by Valspar. The closet looks so much cleaner and fresher with the new paint. It was previously baby blue in there! My husband has a vintage walnut and brass tie rack on his side that I love so much. One thing I wasn’t able to cross off my list was to get the closet doors back on. I think we might be missing some hardware and without the carpet, the doors are a little short. I know we will figure something out. Right now I’m just enjoying seeing the fresh walls and patterned floor in there.

In the theme of making use of what we had, I gave my wall mounted makeup mirror a fresh coat of paint. I covered the mirror in painters tape and then gave it a few quick coats of paint. This helped it match the other fixtures and covered some rust that was starting in some areas.

I used cassmakeshome‘s tutorial to DIY a roman shade, and my gosh, I love it so much. We chose a dark floral pattern to bring a little bit of color and pattern into the room and to stay away from anything too coastal. I’m so happy with how it turned out. It blocks out the sun in the morning, keeping the room cooler, provides privacy, and brings color to the room.

The painted peel and stick tile looks good in the main part of the bathroom and is certainly and upgrade from the carpet. In the water closet though on the original tile it looks so beautiful. We used a matte sealer and it looks just like patterned concrete tile.

The upgrades in this part of the room were simple but made such a difference. We removed the old glass shower doors and replaced them with a clean white shower curtain. The old ceramic towel bars were replaced with new hooks that are so much more functional. The walls and ceiling got fresh paint to match the rest of the room and we replaced the toilet with one that is new and efficient. This little walnut stool looks great with a plant and candle and provides a little spot for extra wash clothes or toiletries.

Overall we are so, so happy with it! I’m also so glad to be done! I loved the challenge of following along with the ORC, but it was definitely different than how I usually work. I tend to feel out my choices as I go on a project and trying to decide on materials and order everything at the beginning was a stretch for me. I’m already thinking of what to do for the fall ORC!

  • Vanity paint (Valspar Slate Tile)
  • Floor tile
  • Floor paint (Base, contrast, topcoat)
  • Faucets
  • Mirror trim
  • Wastebasket
  • Shower curtain rod
  • Shower curtain rings
  • Shower curtain
  • Shower curtain liner
  • Towel hooks
  • Walnut side table
  • Candle
  • Bath mat
  • Soap pump, toothbrush holder
  • Acrylic canisters
  • Wood knobs
  • Wall paint (Valspar Warm Putty)
  • Robe hook
  • Laundry basket
  • Hand towel
  • Hand towel hook
  • Lights
  • Shade and fabric
  • Makeup mirror
  • Toilet
  • Toilet paper holder
  • Dog water bowl

Filed Under: Uncategorized

ORC Week 2: The Prep

May 16, 2021 by admin Leave a Comment

I am so excited to get going on our plans for our bathroom update as a part of the One Room Challenge! This first week we are working on prep. It can be the least exciting compared to painting and replacing fixtures, but it’s one of the most important parts of a project. Spending good time and effort on prep for a project can really make or break the end result.

Here’s what we tackled the first week:

  • Cleaned every nook and cranny – wiped down the walls, the vanity, scrubbed the floor and trim
  • Removed the old towel bars and hooks, patched the walls
  • Removed the wall mounted storage cabinet
  • Cleaned and scraped the ceiling
  • Removed the carpet

I have been looking forward to tearing out the carpet from this room since the day we moved in and dang, did it feel good! After getting the carpet out, I cleaned every inch of the room using water, bleach, and tide. Something I learned from following Go Clean Co.

I washed down the walls, the trim, the vanity cabinet, and the ceiling. We’ve been battling mildew on the ceiling of our shower room for years. I think it’s a combination of a bad choice of ceiling paint and having a subpar vent fan. We replaced the vent fan a few years ago which has helped, but the damage was already done. The steam from the shower has caused the paint to flake. After cleaning the ceiling, I skim-coated it to get it back to a smooth texture.

I also went around the room and inspected the walls for anything that needed repair. The holes where the old towel rods and toilet paper holder had been were obvious ones. The old towel rods were comprised of a plastic rod between two ceramic ends and the ceramic ends had been grouted into the wall. The grout was also backed in newspaper. It seemed like something you would find in a much older home! It left some pretty big holes, so I used metal/fiberglass patches to cover them.

Overall I’m happy with the progress so far. The middle part is so tough sometimes when things are torn apart, but it’s already started to come together!

Next week we hope to:

  • Finish installing the floor tile
  • Paint floor tile
  • Remove the mirror

Filed Under: Uncategorized

Spring 2021 One Room Challenge

May 9, 2021 by admin Leave a Comment

I am so excited to say that I’m participating in the Spring 2021 One Room Challenge this year!

For the past few years we have made a list of ideal projects at the beginning of the year. It helps to keep us organized and on track to meet our goals. My 2021 goal list included a lot of fun interior projects that I am so excited to work on. Unfortunately, most of that list is going to be on hold until next year, while we do some exterior updates. Over the next few weeks, we are having our roof replaced, siding repaired and painted, and driveway replaced. These updates and repairs are badly needed, but also so dang expensive! And that means, unfortunately, that a lot of my fun projects have been delayed a bit.

Our main bathroom, however, needs a facelift. I wrote about it here in my 2020 House Goals, but I’m sad to say it didn’t get done. We are planning just a budget update to tide us over, so it won’t be a huge cost (I’ll share it all at the end). I’m so excited to give it a fresh update!

I have watched others participate in the One Room Challenge each year and just loved following along with the projects. They are always so inspirational and I’ve found some of my favorite people and accounts to follow through the challenge. I’ve debated jumping in for a few years now but could never quite muster the courage. This year, I think the challenge will be the perfect push for me to get this project done and not let it drag out! It will force me to document the projects, which is something I’ve been trying to be better at.

Our bathroom has some great features (giant double vanity, shower and toilet separate from the vanity area), but it also has some features we don’t love, like carpet in the vanity area. We painted the room when we first moved in, but it’s looking a little tired now. We are planning to reuse and repurpose as much as we can, but the space will look completely different. Here’s the moodboard and project plan:

  • Remove the carpet, replace with painted tile
  • Paint the vanity
  • Add vanity hardware
  • Replace the countertop and sinks
  • Replace the toilet
  • Paint the shower room tile to match the vanity room
  • Remove glass shower doors, replace with a curtain
  • Clean, repair and paint walls, trim and doors
  • Replace towel bars & hooks

Total budget: $1,000

I am so excited to get started! What do you think of the plans?

Filed Under: Uncategorized

2020 Home Goal Update

February 6, 2021 by admin Leave a Comment

At the beginning of 2020, we made a point of setting 7 specific goals for improving our house over the year. It was something new for us as we usually fly more by the seat of our pants. Well, I’m here to give you an update on how we did on those goals and I’ll give you a hint, it wasn’t great!

I’m trying to give ourselves a bit of grace because 2020 snuck up on all of us. Even though we were home more, and theoretically could have spent more time on projects, getting materials was often tricky. Home improvement materials were often back ordered or sold out due to high demand and reduced supply. Over the summer I went to the store to get some polyurethane and found the shelves empty. The store associate told me that so many people had picked up woodworking as a hobby, they cleared out the shelves. On top of that, the company had switched to making hand sanitizer, so it would be a while until the shelves were restocked.

On top of the complications getting materials was the mental exhaustion that the events of the year brought for everyone. Over the summer we focused on building a new garden, which you won’t find on the list below. It’s been on my wish list for years to build new raised garden beds and this felt like the year to do it. It was warm early and we had plenty of time at home. Gardening, to me, is also good for the soul. It’s sort of meditative to tend to our plants. And there is nothing better than fresh fruits and vegetables from your own garden. So I’m calling the garden a completed bonus project!

Here’s how we did on the rest:

KITCHEN REFRESH

You can read about our kitchen refresh here. It took us most of the year to complete this project but it was so worth it. We are thrilled with the results and are really enjoying the updated look and improved function of the space. Part of the reason it took us the whole year was that we would finish a project and love it so much. Then we would think “what if we just did x, y & z too?”. Scope creep is real and we gave right in!

Here is what we had for our initial plan: Paint the cabinets a fresh new color, install a peel and stick backsplash, update the countertop with contact paper or paint, replace the hardware, paint the walls, trim, and ceiling, replace the recessed lights, and possibly update the flooring. And here is what we started with:

In the end we: Painted the cabinets, installed a peel and stick backsplash, updated the counter top with contact paper and then paint, replaced the hardware, painted the walls, trim, and ceiling, replaced the recessed lights, installed new peel and stick tile flooring, removed the hutch, DIY’d new base cabinets with countertops, a built in bench seat, and open shelves, and replaced the table and chairs.

PRIMARY BATH REFRESH

I am so sad to say that the primary bathroom didn’t get touched in 2020 other than some deep cleaning. This is the second thing on my to-do list for 2021 behind some work on our bedroom. I have already worked up a mood board and I am so excited to dig in. Keep an eye out for more details on this one soon!

Here’s the current plan for our bath refresh: Paint the vanity, add hardware, replace the countertop and sinks, paint the walls, trim, and ceiling, put the closet doors back on, rip up the carpet and paint or tile the floor.

GARAGE ORGANIZATION

I’m going to give us a solid B on this one. We completed a lot on our list, but we still have more to do this year. Building the new workbench was a huge win for us. The top gives us a huge work surface and helps keep long boards supported on the miter saw. The two roll-out carts provide a huge work surface, outfeed support for material coming out of the table saw, and are packed with storage. I’ll write a post with more details on the workbench soon, but we based them off of Ana White’s plans here.

Here’s how we did on our plan for the garage: Build a new workbench packed with storage and function, add tool storage on the wall behind the workbench, replace the outlets, add one or two more outlets, improve lighting, tear down the bulky overhead storage, build a plywood storage cart, hang lumber storage racks, tear down the corner storage rack and add a large shelving unit.

DRIVEWAY REPLACEMENT

I’m going to give us a solid B on the driveway replacement too even though, technically it didn’t get done.

We actually got quotes and put down a deposit, but apparently there was a mad dash for driveway replacements this year, and the company was completely booked. They thought they might be able to squeeze us in, but it didn’t work out. We are already on the list for spring 2021 though so it’s happening for sure!

Here’s the plan for the driveway: Get it done!

FINISH PRIMARY BEDROOM

I am so embarrassed to admit this but our bedroom got zero progress last year. Well at one point I did buy a new duvet, but then I decided that I didn’t like it and returned it. Is that negative progress? This room is first on our list this year.

Here’s the plan for the bedroom: Update the bedding, replace the lamps, add a rug, build a new crate for Maggie, build an elevated bed for Wilbur, replace the curtains, replace the trim (it is so embarrassing how long we have been without trim in our bedroom!), paint the door, add some decor and replace the ceiling fan. Eventually, we are going to build in closets along the wall with the entry door, but that will be for another year.

GUEST BEDROOM REFRESH

No progress here. Are yous starting to wonder what I did all year? Me too.

Here’s the plan for the guest bedroom: Paint the walls, replace the trim, install a new closet organizer, replace the closet light, replace the curtains, purchase a new rug, replace or otherwise sort out bedside tables, purchase lamps, DIY a fun wall treatment, paint the door, add some decor.

BASEMENT CLEANING & ORGANIZATION

The basement did see some progress in getting clean and organized, but it still needs more work. We cleaned out and donated a lot of stored decor and other “stuff” over the summer which felt amazing. Does anyone else think it feels great to get rid of stuff? Like way better than bringing stuff into the house? We also bought a bunch of clear bins and started to organize tools and other house supplies. It’s better, but definitely staying on the list!

Here’s the plan for the basement: Remove all old insulation, clean the walls and paint with a mold-resistant primer, remove and replace storage shelves as needed, clean, purge and reorganize stuff in storage and create a more comfortable workout area.

BONUS: GUEST BATHROOM REMODEL

Last year I called this a “stretch goal”. As in, if we finish everything else on our list, maybe we can do this too. lol

Considering how little progress we made on our other goals, I hope it’s obvious we didn’t get to this one. It probably won’t be on our 2021 list either unfortunately. In addition to the things we are carrying over from 2020, we have a few things that are probably going to be bumped up on our list, like a complete roof replacement.

Here’s the plan for the guest bathroom: Replace floor tile, shower tile and tub, toilet, vanity, mirror and lighting, remove the linen closet and replace with a piece of furniture, paint and add new accessories.

Filed Under: Uncategorized

Budget Kitchen Remodel

January 24, 2021 by admin 1 Comment

One of our 2020 House Goals was to give our kitchen a refresh. I did not anticipate that this would literally take the entire year, but I think 2020 snuck up on all of us, so here we are! Even though it took much longer than I wanted, we are so happy with the end result. I’m so excited to share a few photos today!

As a quick recap, here is what our plan was initially:

Paint the cabinets a fresh new color, install a peel and stick backsplash, update the countertop with contact paper or paint, replace the hardware, paint the walls, trim, and ceiling, replace the recessed lights, and possibly update the flooring.

And here is where we started:

I am happy to report that we checked all of those boxes and more! When we got done with our initial list, we loved how things were coming together so much that we gave in to a bit of scope creep. We ended up also completely replacing the sink and faucet, removing the built-in hutch, and replacing it with DIY cabinets, a built-in bench, and some open shelving.

I think the new paint color on the cabinets was the most impactful change. The cabinets had been badly painted and were in dire need of some love. We used Sherwin Williams Emerald Trim Enamel in a satin finish. The less glossy finish helps hide some of the grain and imperfections in the oak cabinetry, but the enamel finish makes it durable and easy to clean.

Updating the countertops ended up being a process. We started with contact paper and loved the look and the finish, but it didn’t adhere well despite doing all of the proper prep work and installation practices. After a few weeks, we realized it just wasn’t going to work, so we pulled it all up and started fresh. We later used a different contact paper for another area and it worked beautifully, so I now think it was just a poor quality product.

The second time, we used this Giani White Diamond Countertop Paint. I’ll be honest – I’m a little “meh” at the results. It looks good enough, and definitely better than the baby blue laminate that’s underneath, but I’m not in love with it. Maybe it’s my poor artistry, but I don’t think it’s going to fool anyone to thinking it’s stone. It looks and feels very much like a painted laminate countertop. The clear protective coat was also rough and bumpy after application. I ended up lightly sanding and applying several coats of polyurethane over top.

The peel and stick backsplash, and LED retrofit lights were a cinch to install and look fantastic. We used this brass cup pull for the drawers and these knobs for the doors. Polished or unlacquered brass hardware would have been our first choice but these were budget-friendly and fit the need. Updated hardware can really change the look of a room and the brass hardware with the dark green/gray paint is such a lovely combination.

We took a risk on the floor and installed these peel and stick tiles. I was really nervous that the pattern would be too bold or busy, but I actually love it. If we were installing regular tile, I probably would have been to nervous to choose such a bold pattern, knowing it could potentially be a costly mistake to replace.

A leak in our faucet necessitated replacement and we decided to swap out the sink for a large single bowl stainless version at the same time. It was so worth the effort. The new sink is huge and easier to keep clean than the previous. The faucet has a more modern look, multiple spray settings and doesn’t require us to feed a hose manually back into the faucet if we pull it out.

As I said before, we also gave in to some scope creep by removing the hutch and replacing it with more cabinetry. The hutch was bulky, closed off the breakfast nook, provided really awkward storage, and needed some repairs. I have wanted to tear it down since the day we moved in, and it was just as satisfying as I thought it would be to get it done! We replaced it with DIY base cabinets using Bourbon Moth Woodworking‘s YouTube tutorials. Cabinet building was so much fun, and easier than I thought it would be – his instructions were fantastic. For the countertops, we laminated together two 3/4″ pieces of MDF cut to fit the cabinets. We built the shelves using this tutorial from Yellow Brick Home.

What I loved most about this budget-friendly “Phase 1” update was knowing nothing would be permanent. It allowed us to make some decisions that were out of our comfort zone knowing that this isn’t forever. In the end, we are so, so happy with how everything came together. It is such a warm happy space for us and we are loving spending time here.

Sources:

  • Cabinet Paint (Color – Sherwin Williams Thunderous)
  • Wall Paint (Color – Benjamin Moore Revere Pewter)
  • Ceiling Paint (Color – Sherwin Williams – Alabaster)
  • Trim Paint (Color – Sherwin Williams Alabaster)
  • Countertop Paint
  • Peel and Stick Backsplash
  • Retrofit LED Recessed Lights
  • Floor Tile
  • Cup Pulls
  • Knobs
  • Shelves – Unfinished pine stair tread
  • Brackets
  • Bracket Paint

Filed Under: Uncategorized

2020 Holiday Gift Guide – Stocking Stuffer Edition

November 29, 2020 by admin Leave a Comment

In our family, we have two rules for stocking gifts; They have to be under $20 and small enough to fit in a stocking. Simple rules but putting some boundaries on it keeps the gifts fun and creative. I’m going to keep the same rules for these gifts. They will all be small(ish) in size and under $20.

  1. One of our personal favorite stocking stuffers is gourmet popcorn from PrimaPop. I highly recommend it if you’re local to Rochester. If you aren’t local and are looking for something that can be shipped, try Lammar & Marie’s Gourmet Popcorn. I’ve heard great things!
  2. I got this small Bluetooth speaker for my husband on a whim a few years ago and it was one of his favorite gifts. It’s small, inexpensive, pairs easily, and has decent sound quality.
  3. A makeup eraser cloth for getting your face squeaky clean. With just warm water it will take off makeup (even waterproof!) or sunscreen and can be washed and reused over and over.
  4. A To-Do List notepad for organizing those work from home days and making more time for the fun stuff.
  5. This hand sanitizer has been my favorite for years, and let’s be honest, we all need more hand sanitizer these days.
  6. This nature kaleidoscope would be such a sweet stocking gift for your the kiddos in your life!
  7. I spotted this bookstore scented candle on Fed & Fit’s 2020 Gift Guide and it sounds so lovely. It is definitely going on my wishlist.
  8. A good chapstick is always a good stocking stuffer and Ned’s is one of my favorites. It comes in a few great flavors, is super moisturizing, and lasts forever.

Filed Under: Uncategorized

2020 Holiday Gift Guide – Favorite Things Edition

November 22, 2020 by admin Leave a Comment

For this gift guide, I’m highlighting our favorite things! These are our tried and true possessions and things that give us joy every day. These gifts cover a wide range of cost and size and even something for the doggo in your life. If you purchase any of these items, I hope you love them as much as we do!

  1. I bought my husband this gas smoker for his birthday and he took right to it. Our summer had several relaxing days and nights spent trying different recipes with the smoker and sharing some amazing meals.
  2. This dog bed has been a favorite purchase between dogs and humans at this house! Our dogs seem to love the soft and supportive bottom cushion and pillow sides. I love that it’s easily washable and has been super durable!
  3. This one is an investment, but our Weber gas grill always tops our favorite things. We use our grill just as much as our oven or stove and it has been well worth the cost. It cooks food beautifully and has held up perfectly.
  4. My subscription to Mighty Fix has been such a fun surprise each month. I liked it so much I bought one for my mom as well! It’s the perfect gift for someone looking to make their life and home a little more eco friendly.
  5. I discovered Dazzle Dry earlier this year through Fed and Fit and I’m obsessed! Their system has serious staying power and is free of common toxic ingredients.
  6. We have a few electronic locks at our house and they are a favorite thing for sure! They make getting in the house easier and more convenient, especially if you’re carrying an armful of groceries or frequently lose your keys. This one is sleek, modern, and reasonably priced.
  7. These wireless charging pads are a staple in our house. They are sleek and unobtrusive and charge our phones quickly. They would be a great gift for someone with wireless charging capability already in their phone, or bundled with this converter if it isn’t!
  8. Grounds and Hounds coffee is a favorite in our house and would make a great gift for anyone who loves coffee and dogs! Their coffee is delicious and your purchase will help support rescue pups!

Filed Under: Uncategorized

2020 Holiday Gift Guide – Homebody Edition

November 15, 2020 by admin Leave a Comment

This gift guide was the absolute easiest to put together. I am a true homebody at heart. I put together a list of my top eight gifts that I think any homebody would love. They would also be great gifts for anyone who is having to spend a lot of time at home due to the Coronavirus pandemic. These gifts could help them make it a little easier and cozier.

  1. First and foremost – a Homebody hoodie from ProperTee. An absolute essential for those of us who would rather be at home.
  2. The Home Edit and The Home Edit Life books for the homebody looking to organize their home and life. Bonus points if you throw in a Netflix gift card so that they can watch the show too!
  3. A gift box from ButcherBox. It is our absolute favorite way to simplify grocery runs, allow for a bit more time at home, and support humane, sustainable farming.
  4. A soft plush throw blanket is always a welcome gift at our house and this dark blue color is so beautiful.
  5. A smart thermostat will help them be comfy while staying home or allow them to set the temperature to be perfect when they get home.
  6. Our robot vacuums are one of my favorite things. Getting that freshly vacuumed floor look and feel without lifting a finger is the best feeling.
  7. A Nespresso VertuoPlus coffee maker can create coffee shop worthy drinks without having to leave the house.
  8. The Year of Cozy book. The book description reads “125 Recipes, Crafts and other Homemade Adventures” and I don’t know what could be better for a homebody.

Filed Under: Uncategorized

2020 Holiday Gift Guide – Small Business Edition

November 8, 2020 by admin Leave a Comment

We try our best to shop small and local for gifts when we can, but shopping small businesses outside of our local area is my second choice! The gifts that we have given previously from small businesses, hand-made items especially, have always been our family’s favorite. The combination of the thoughtfulness of the gift giver, and the effort poured in by the maker makes the gift so special! Here is my roundup of gifts from small businesses.

  1. A delicious lemonade gift bundle from Me and the Bees, a business launched by Mikaila Ulmer when she was 5 years old that helps to save the honeybees.
  2. A set of spices from Balanced Bites would be perfect for the foodie in your life. Diane’s spice blends are the perfect addition to any meal. Recently she started to add granola and infused sugars to her shop, too!
  3. This gorgeous hand made wood stand would be perfect for holding a watch and jewelry in a beautiful display.
  4. These foodie dice seem like a great way to solve the “what’s for dinner” debate!
  5. Janery makes super chic dog and cat beds. They’re also making some beautiful (and highly recommended!) face masks for adults and kids!
  6. Cook Once Eat All Week is the perfect gift for those in your life who want a good meal on the table during the week but are short on time.
  7. A bundle of handmade bath & skincare items is always a good gift, and this one from Honeymilk looks so lovely!
  8. Natalie Rae’s shop has gorgeous items like this tote bag, handmade with repurposed fabrics from the Hmong Women of North Vietnam.

Filed Under: Uncategorized

2020 Holiday Gift Guide – Rochester Edition

November 1, 2020 by admin Leave a Comment

Shopping local small businesses when we are buying gifts is our favorite way to shop. Especially around the holidays! I always feel like you’re giving two gifts at once when you can buy from a small business. When it’s a local one that can support your home community, that’s even better! Since Rochester, NY is the city we call home, I’m picking eight gifts that you can purchase to show some love to this community.

  1. This beautiful Architecture of Rochester, NY print from the Etsy shop for Max Wilkins Illustrations.
  2. This cozy sweatshirt with a reminder to Support Your Local Girl Gang from local shop Peppermint, which is a nod to a lovely Rochester business, Roc Girl Gang.
  3. Any of the candles from Light My Candle Co., like this yummy sounding Cranberry Marmalade one.
  4. This stunning hand-sewn leather bag from local artisan Carrie George.
  5. These hand bleached vegan sweats for those who haven’t gotten their tie-dye fix yet from local shop saintvegann.
  6. This eco-friendly Straw and Chopstick Travel Set or this machine washable Paper Grocery Bag from Branch Homestead.
  7. These beautiful handmade Rose Quartz Stacker Rings from Madison Sophia Jewelry.
  8. A bottle of Bourbon Cream from Black Button Distilling for a little extra warmth this winter.

There are so many amazing makers in Rochester, it was tough to choose just eight! If you’re looking for a few more ideas, check out The Market at The Armory. They have an amazing listing of artisans that you can frequently find at the market, and there are some incredible finds!

Filed Under: Uncategorized

  • Go to page 1
  • Go to page 2
  • Go to Next Page »

Primary Sidebar

Recent Posts

  • ORC Week 8: The Reveal
  • ORC Week 2: The Prep
  • Spring 2021 One Room Challenge
  • 2020 Home Goal Update
  • Budget Kitchen Remodel

Hi there! I'm Samantha. Thanks for stopping by! Here I'm writing about making a house a home, making dang good food and finding new ways to spoil our dogs. I hope you'll introduce yourself and stay a while!

Copyright © 2025 Off East Street on the Foodie Pro Theme